

The Complete Guide to Getting Started With The Graph
An overview and step-by-step guide on building a subgraph.


A Guide To Getting Started With The Graph
TL;DR: The Graph is an indexing and query protocol that allows developers to build APIs with data from the blockchain. The data from these APIs can be queried via the GraphQL query API. To build a decentralized API, a developer creates a subgraph that defines:
- the data source (smart contracts)
- the data that should be indexed
- the events you want to listen for
- resolvers to execute when specified events are emitted which transform the raw data from the blockchain and save it to The Graph Node.
Developer Resources for Building with The Graph
A step-by-step guide to building the subgraph we're following in this post can be found here.
A cheat sheet for working with AssemblyScript can be found here.
Check out and query the subgraph we'll be building in this post here.
As a Developer, Why Should You Care?
The Graph has become one of my favorite protocols to work with in the web3 world. When I started using The Graph, it felt just like when I first started using web APIs and discovered a new layer of development. With The Graph, you can start working with real data from the blockchain and use this data to create useful and beautiful experiences. The Graph is one of the most important pieces of the web3 stack, allowing developers to easily interact with blockchain data in a way that wasn’t possible before. In this post I am hoping to answer the following questions:
- What is The Graph?
- What role does The Graph play in the web3 stack?
- How does The Graph actually work?
- How can I use The Graph to build a web3 API?
What is The Graph?
The Graph is a protocol for indexing and querying data from various blockchains with GraphQL. The protocol enables an easy and efficient means of querying information from any smart contract deployed on the blockchain and is the API layer of the web3 stack. In simple terms, it means that you can use The Graph to build a decentralized API with data from the blockchain. These APIs, called subgraphs, can be used by anyone. Explore what's out there using the subgraph explorer.
Indexing generally refers to a process of turning unordered data into an order that will maximize the efficiency of a query made against that data. To read more about indexing, check out this post which goes over how indexing works.
The Graph's ecosystem is made up of four roles: developers, indexers, delegators, and curators. Indexers stake the native Graph token, $GRT, and are incentivized to correctly index subgraphs through query and index rewards. Delegators stake $GRT to Indexers and earn a portion of the Indexer's query fees. Curators signal a subgraph to indicate that they are high quality and should be indexed by The Graph Network. Read more about the roles here.
A Quick Refresher on Blockchain
A blockchain is a public database that is shared by a distributed network of computers. The blockchain is a series of data and states stored in batches, known as blocks. Writes to the blockchain, like changing the state of a variable or saving new data to the blockchain, are called transactions. Transactions are cryptographically signed by a wallet address, and this is why you are required to connect a wallet before interacting with a smart contract or a dapp. These transactions and their signatures and stored permanently on the blockchain, accessible by anyone performing a read operation.
There are two types of transactions: Transactions from one wallet to another and contract deployment transactions. Both of these transactions are ‘writes’ to the blockchain that changes state. These transactions and their associated metadata are the information that a developer might want to query. Want to query for the current owner of that NFT you've had your eye on? Want to query for the last 5 transactions at a wallet address? You can create a subgraph for that.
Querying Blockchain Data is Really Hard
The data that you can query against the Ethereum blockchain falls into two categories: easy and hard. There is some information that you can query for using the smart contract’s built-in getter methods. For example, if the smart contract for an NFT collection is using an ERC-721 token implementation, anyone can access the methods to get the owner of an NFT based on the tokenID, and the number of tokens at a particular address. These getter methods allow us to query for easy data.
If you wanted to query specific information that involves filtering, mapping relationships, and searching by traits you would have to spend some time manually doing these operations on the client-side after reading information from the blockchain. Due to the nature and structure of a blockchain, data that you may want to query for could live at different blocks, and there is no built-in mechanism to identify, categorize, or query for that data.
Life Before The Graph
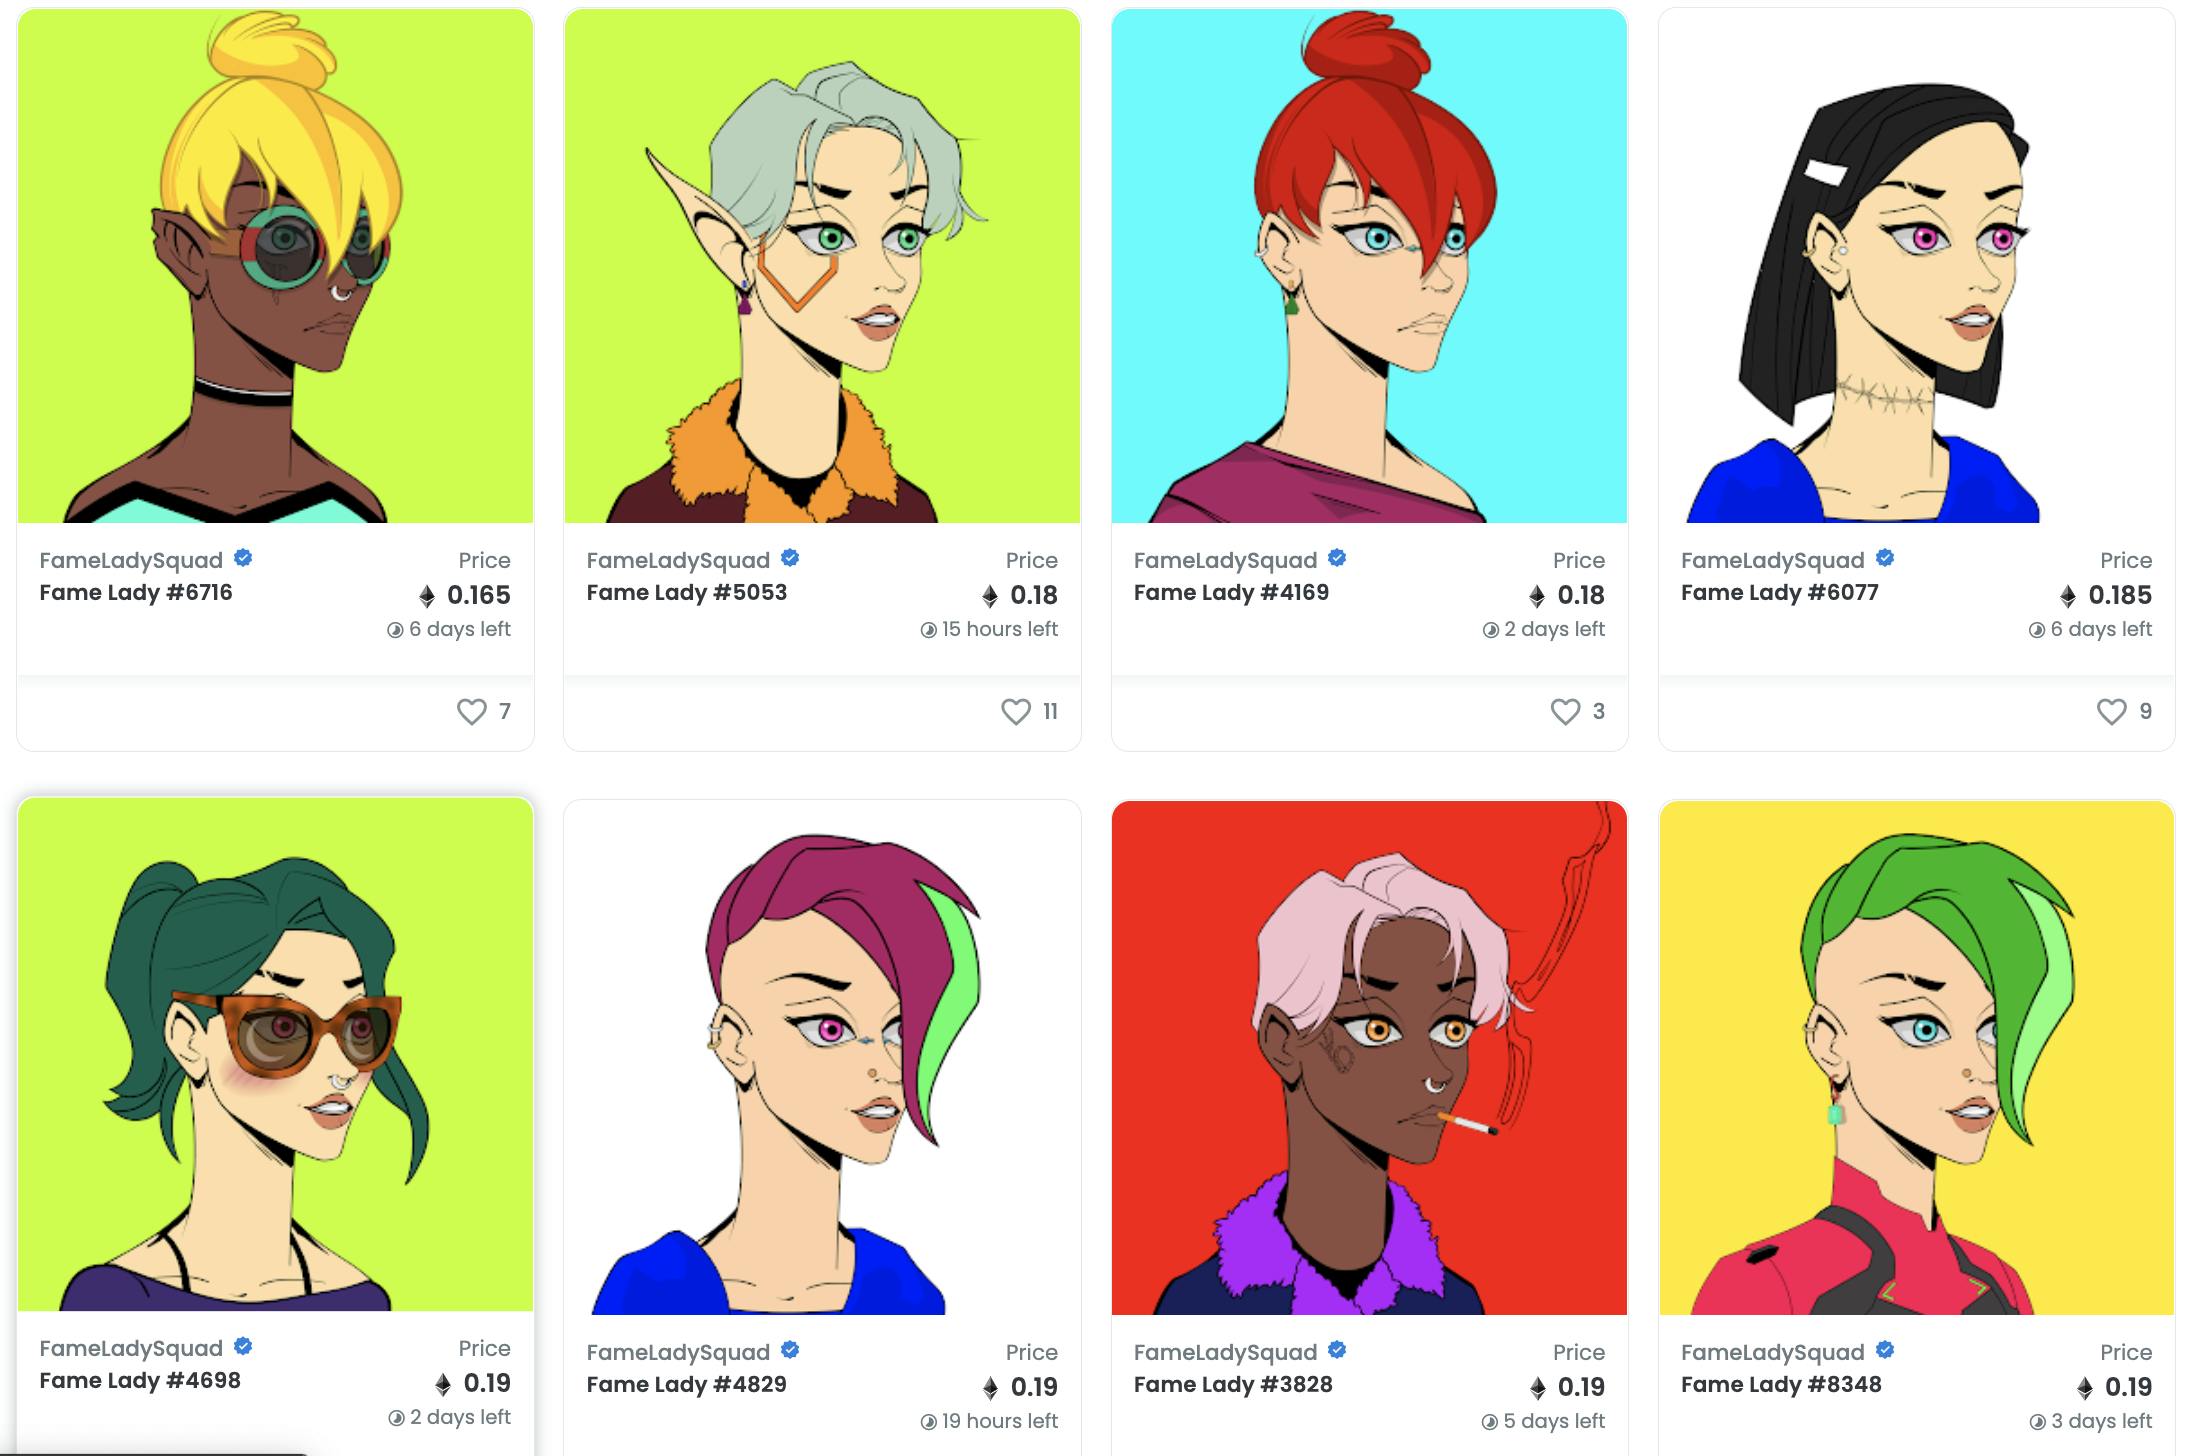
Before explaining how The Graph works, I find it’s easier to start by explaining what indexing and querying a blockchain like Ethereum would look like without the protocol. Let’s say you wanted a new pfp NFT. I’m a big fan of Fame Lady Squad so let’s use their collection as an example.

 If I wanted to query which Ladies are in existence with straight hair, brown eyes, light skin, and a smiling face, I would have to take each unique
 tokenID that maps to a Lady, read the metadata stored in IPFS, aggregate the data, and then write a program to filter witches that match my description. Aside from this taking a lot of manual work, this process would be extremely slow.
My other option would be to run my own server, process, and store transactions made to the blockchain, save them in a database, index my database for reasonable query times, and build an API to make this data accessible via an endpoint that could look like this: https://api.fameladysquad.com/ladies/{hairstyle}.
Neither of these options is viable or efficient for developers without massive engineering resources. The web3 ecosystem needed a way to quickly and efficiently make complex queries against the blockchain. That’s where The Graph comes in.
Creating a Subgraph Is Surprisingly Easy
Anyone can use The Graph to index specific transactions they want to make available to query for. Users do this by creating a subgraph. The Graph is based on the GraphQL API, so if you've worked with GraphQL some of this may feel very familiar.
A brief overview before getting into a step-by-step on how to build a subgraph: Based on the contract address(es) that you want to query data from, you define your schema. A schema is a data structure built around the data that you want to query.
Then, you define which events to listen for and define event handlers to transform the raw data read from the blockchain into the properties that you want to query. These mappings are similar to GraphQL resolvers in that they fetch the data from the selected data source and then apply some logic to put them in the correct format for querying.
Anatomy of a Subgraph
The Graph’s CLI makes it really easy to get started, as they provide you with some boiler plater code. You only have to interact with 3 files in your repo to deploy a subgraph:
- Manifest (
subgraph.yaml) - The manifest defines what data source(s) your subgraphs will index. - Schema (
schema.graphql) - The GraphQL schema defines what data you wish to retrieve from the subgraph. - AssemblyScript Mappings (
mapping.ts) - This is the code that translates data from your data sources to the entities defined in the schema.
Building a Subgraph
There's no better way to learn than to do the thing. We'll follow my subgraph workshop to create a subgraph for Fame Lady Squad, an NFT project. With this subgraph, users will be able to query for information about each Lady in this collection.
Some resources that you might find helpful:
- You can find the code for this project here.
- A cheat sheet for working with AssemblyScript which can be found here.
- Check out and query the subgraph we'll be building here.
Note: The Graph offers two products: the Hosted Service and Subgraph Studio. Subgraph Studio is the fully decentralized version of the Hosted Service. Hosted Service will eventually be sunset once Studio reaches feature parity. Because our project’s metadata is stored in IPFS, we will be using the Hosted Service.
You can spin up a subgraph in just a few minutes with the help of The Graph’s CLI.
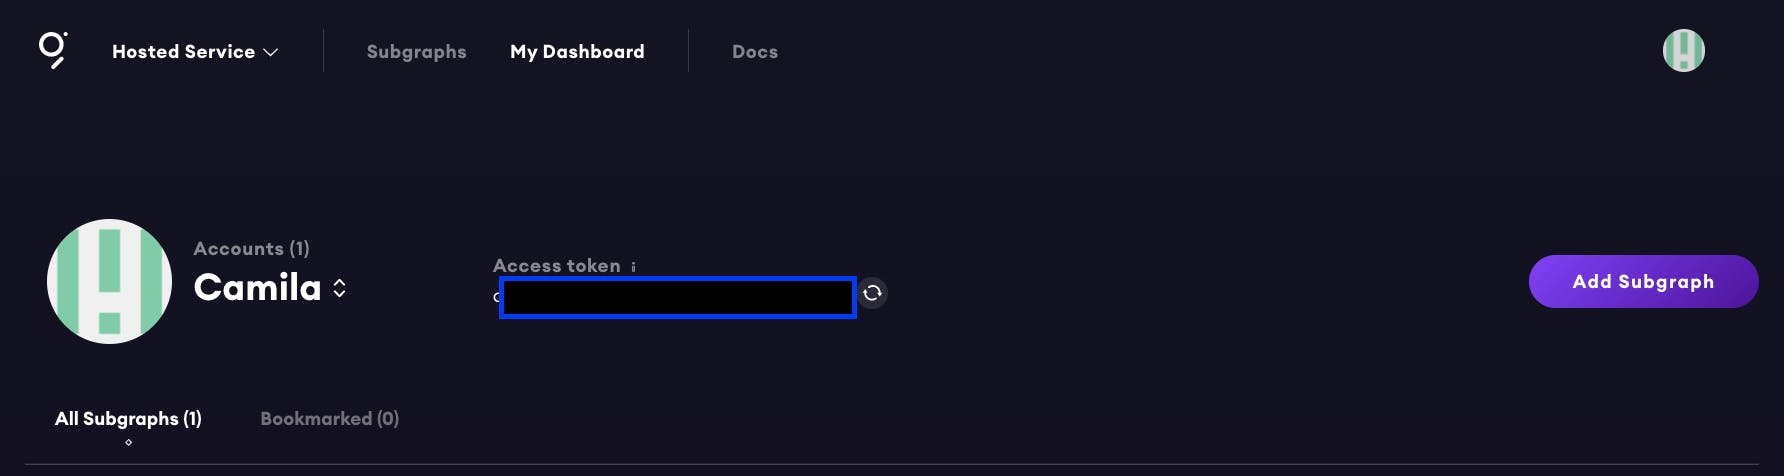
1. Head to the Hosted Service and sign up with Github.
2. Navigate to “My Dashboard”, then hit “Add subgraph” and give it a name. The other details are optional. Then hit “Create Subgraph” at the bottom of the page. You’ll notice you’re given an access token which you’ll need to deploy your subgraph later.
3. Install The Graph CLI with this command:
npm install -g @graphprotocol/graph-cli
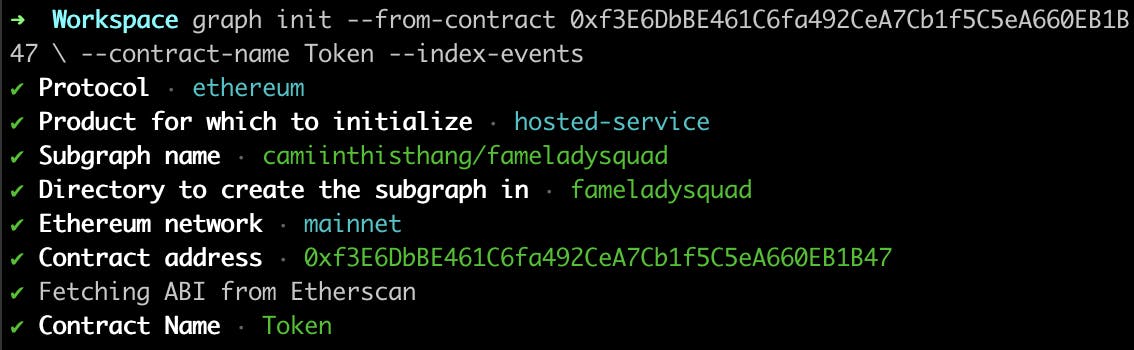
4. Initialize your subgraph via the CLI command:
graph init --from-contract 0xf3E6DbBE461C6fa492CeA7Cb1f5C5eA660EB1B47 \ --contract-name Token --index-events
By using the index-events flag, the CLI will automatically generate some code based on the events emitted from the contract address you passed in.
You’ll be prompted to fill out additional details about your subgraph like the protocol, product, etc. When you fill out the subgraph name, it should be in the following format: yourgithubhandle/subgraphname (the name you used when creating your subgraph in step 2.)
5. Define your schema using the GraphQL interface definition language. The only major difference between standard GraphQL schema and The Graph is the @entity directive as well as the data types that are unique to The Graph. For a complete overview, check out this page from the docs. In the schema, you should model the entities and their properties you wish to make available for querying against your data model. You should avoid modeling entities around events. The way that you model your entities in your schema is entirely up to you and what you are trying to build.
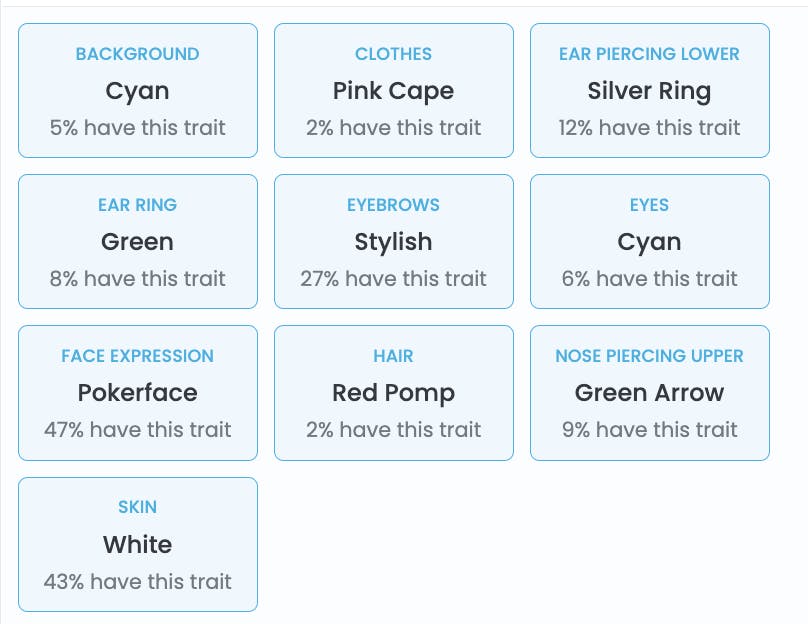
Since we're building an API for Fame Lady Squad, I'll model the properties you can query for around the metadata available for this collection.
Note: To see what attributes are available as metadata, you can grab the IPFS hash and read all the properties. This article explains how to view the metadata of a token/collection using the IPFS hash..)
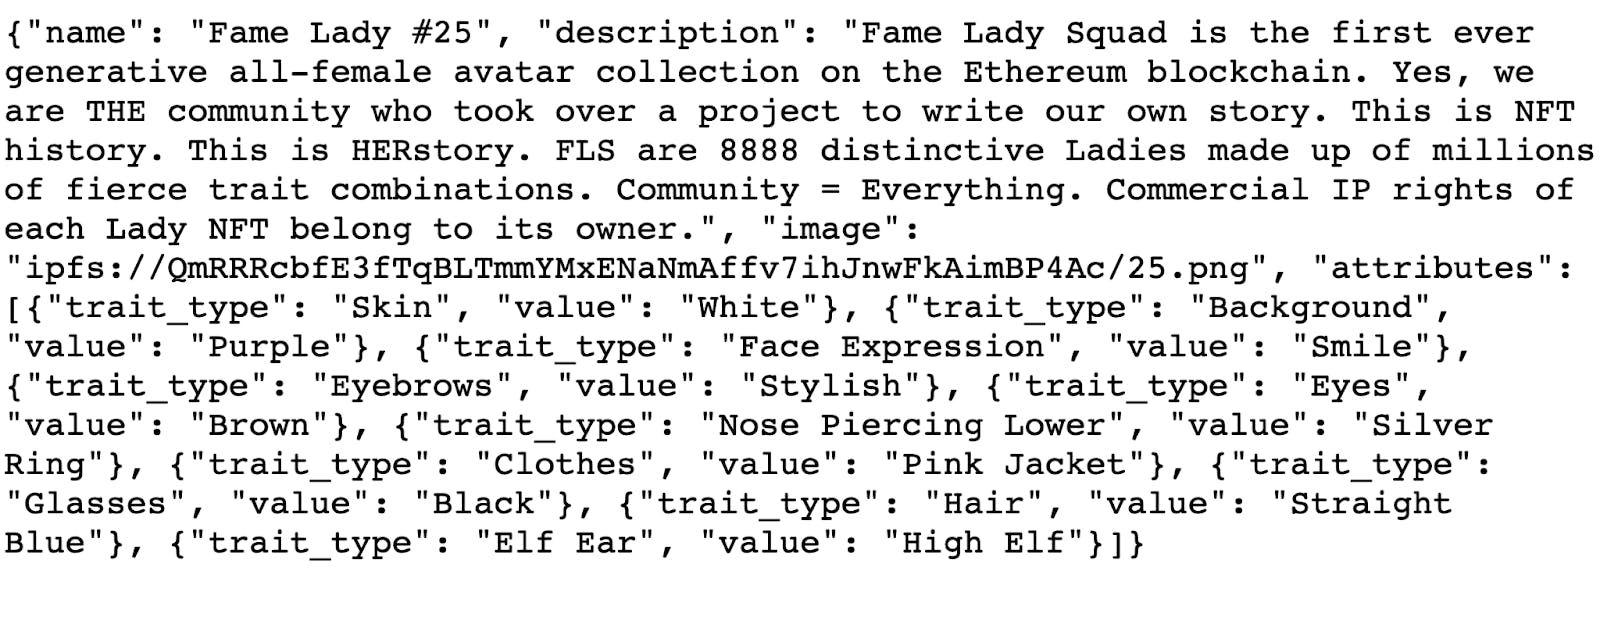
Tip: Throw this into an online JSON formatter to be able to view this data more easily.
type Lady @entity {
  id: ID!
  tokenID: BigInt!
  tokenURI: String!
  owner: User
  name: String
  faceExpression: String
  hairStyle: String
  skinColor: String
  eyeColor: String
}
Because I want to be able to query for information about the owner of a Lady, we'll create a User entity that is derived from the Lady at the Owner field.
For more on declaring relationships between entities, check out this doc. Make sure you save your changes in this file when you’re done.
type User @entity {
  id: ID! # wallet address
  Ladies: [Lady!] @derivedFrom(field: "owner")
}
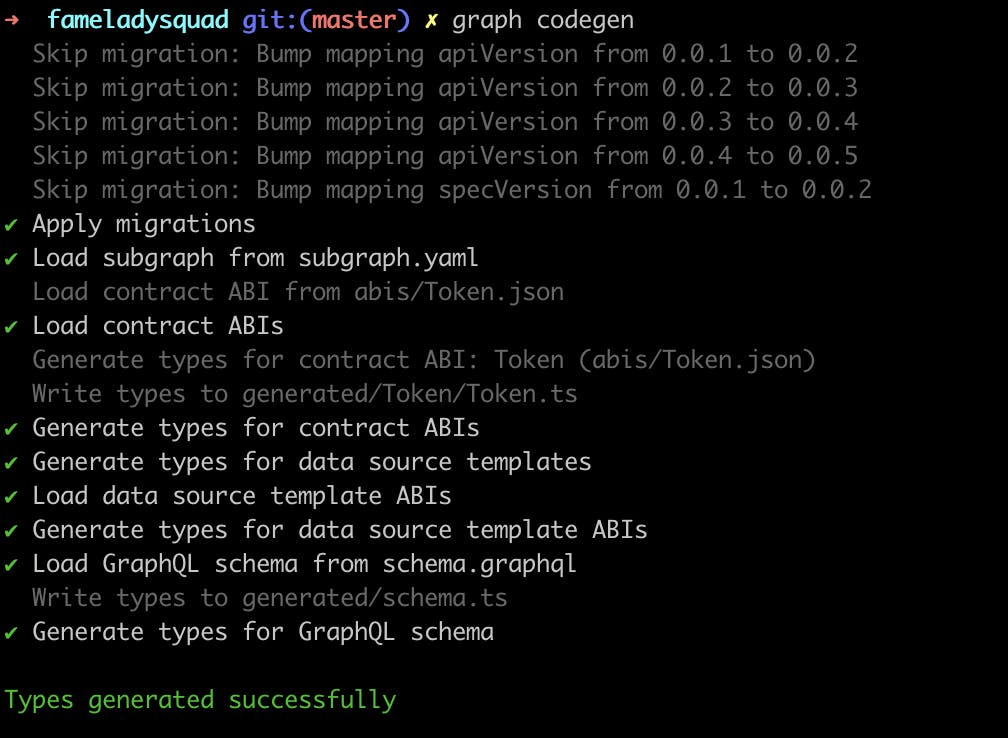
6. To get some free code out of the box by running this command: graph codegen. This command will provide you with some AssemblyScript code in your mappings.ts file as well as code in your subgraph.yaml file. The generated code comes from a combination of your schema and the contract ABIs which are gathered automatically from your data source defined in your subgraph.yaml
file.
7. In the .yaml file, you will define the following:
- The events you want to listen for. In
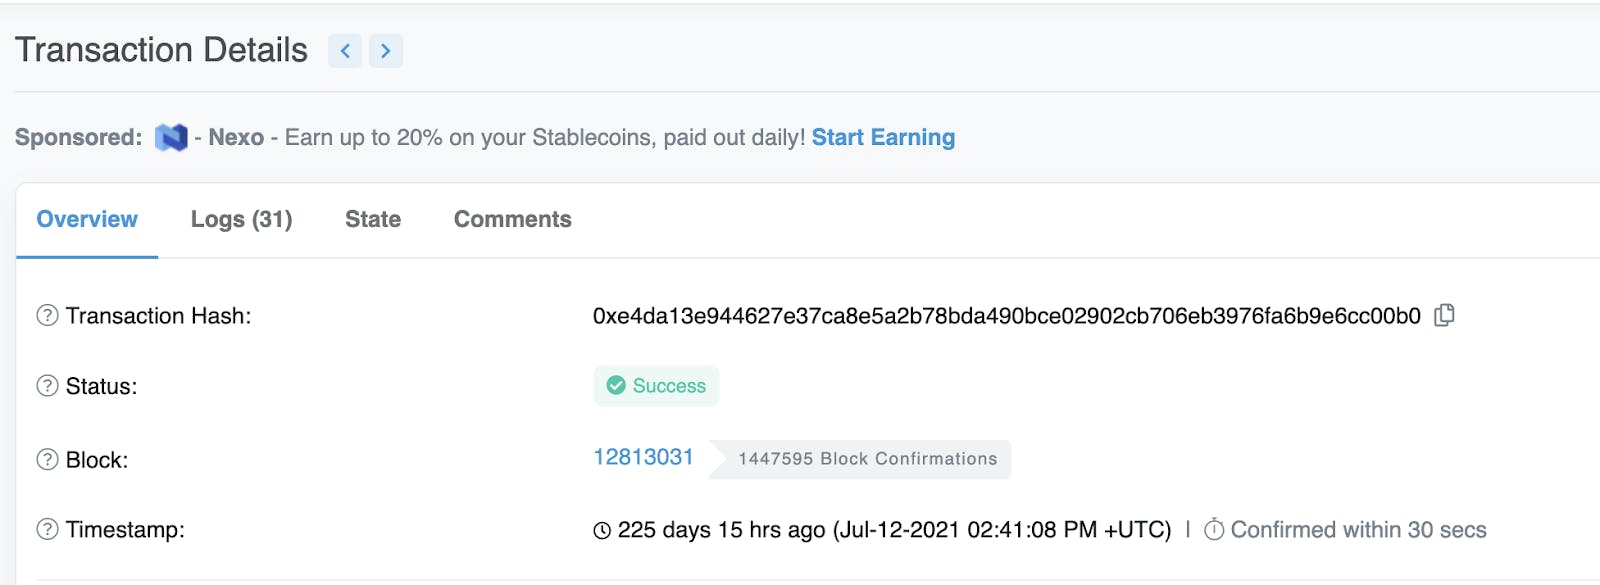
dataSources.mapping.eventHandlers, delete any events that you don’t want to listen for. With each event, there is anhandlerfunction that is named. These are the functions that you will define inmappings.ts. - The starting block for which the indexer should start indexing. If omitted, your subgraph will start looking for your events starting from the very first block. Find this value on etherscan by going to the first page of transactions, clicking the
transaction IDand looking for the block number.
- The names of the entities you want to query information about. Update the name of your entities to match the entities you defined in your schema at
dataSources.mapping.entities.
specVersion: 0.0.2
schema:
  file: ./schema.graphql
dataSources:
  - kind: ethereum
    name: Token
    network: mainnet
    source:
      address: "0xf3E6DbBE461C6fa492CeA7Cb1f5C5eA660EB1B47"
      abi: Token
      startBlock: 12813031
    mapping:
      kind: ethereum/events
      apiVersion: 0.0.5
      language: wasm/assemblyscript
      entities:
        - Lady
        - User
      abis:
        - name: Token
          file: ./abis/Token.json
      eventHandlers:
        - event: Transfer(indexed address,indexed address,indexed uint256)
          handler: handleTransfer
      file: ./src/mapping.ts
8. Lastly, write mappings in AssemblyScript which transforms the raw Ethereum data read from the blockchain into the entities defined in your schema. This is the trickiest part because there are some concepts that are unique to The Graph Node. Check out this cheat sheet to help you write your mappings, complete with examples. The big idea here is to work with raw data from the blockchain and apply logic to transform it to meet the needs of your schema.
Example: Following the Fame Lady example we talked about above, the raw data we will get from the blockchain will be using the getter methods that come standard with an ERC-721 implementation. Because of this, the only data that will be able to read directly from the blockchain will be the tokenID, and the owner. In our mappings, we have to work with these two pieces of data to resolve the rest of the properties: hairStyle, skinColor, eyeColor, and faceExpression. Using the tokenID, we would need to use the IPFS hash to see where this metadata is stored. Once we access this, we need to save this data to a variable, and then save this variable to The Graph node to make it accessible to query. Check out the source code for this here.
import {
  Transfer as TransferEvent
} from "../generated/Token/Token";
import { Lady, User } from "../generated/schema";
import { log, ipfs, json, JSONValue } from "@graphprotocol/graph-ts";

const ipfsHash = "QmTngWTnURuyiz1gtoY33FKghCiU2uQusXpnUc36QJNKsY";

export function handleTransfer(event: TransferEvent): void {
  let lady = Lady.load(event.params.tokenId.toString());

  if (lady == null) {
    lady = new Lady(event.params.tokenId.toString());
    lady.tokenID = event.params.tokenId;
    lady.tokenURI = "/" + event.params.tokenId.toString();

    let metadata = ipfs.cat(ipfsHash + lady.tokenURI);
    if (metadata) {
      const value = json.fromBytes(metadata).toObject();
      if (value) {
        const name = value.get("name");
        if (name) {
          lady.name = name.toString();
        }
      }
      let attributes: JSONValue[];
      let ladyAttributes = value.get("attributes");
      if (ladyAttributes) {
        attributes = ladyAttributes.toArray();

        for (let i = 0; i < attributes.length; i++) {
          let item = attributes[i].toObject();
          let trait: string;
          let traitName = item.get("trait_type");
          if (traitName) {
            trait = traitName.toString();
            let value: string;
            let traitValue = item.get("value");
            if (traitValue) {
              value = traitValue.toString();
              if (trait == "Hair") {
                lady.hairStyle = value;
              }
              if (trait == "Skin") {
                lady.skinColor = value;
              }
              if (trait == "Eyes") {
                lady.eyeColor = value;
              }
              if (trait == "Face Expression") {
                lady.faceExpression = value;
              }
            }
          }
        }
      }
    }
  }
  lady.owner = event.params.to.toHexString();
  lady.save();

  let user = User.load(event.params.to.toHexString());
  if (!user) {
    user = new User(event.params.to.toHexString());
    user.save();
  }
}
9. If you’ve made it this far give yourself a pat on the back! Now you’re ready to deploy your subgraph so that you can use your API in your dapp. First, you must authenticate. Copy your access token by navigating to “My Dashboard.” Then, run this command in the terminal: graph auth https://api.thegraph.com/deploy/ <ACCESS_TOKEN>
10. Deploy your subgraph with this command: yarn deploy
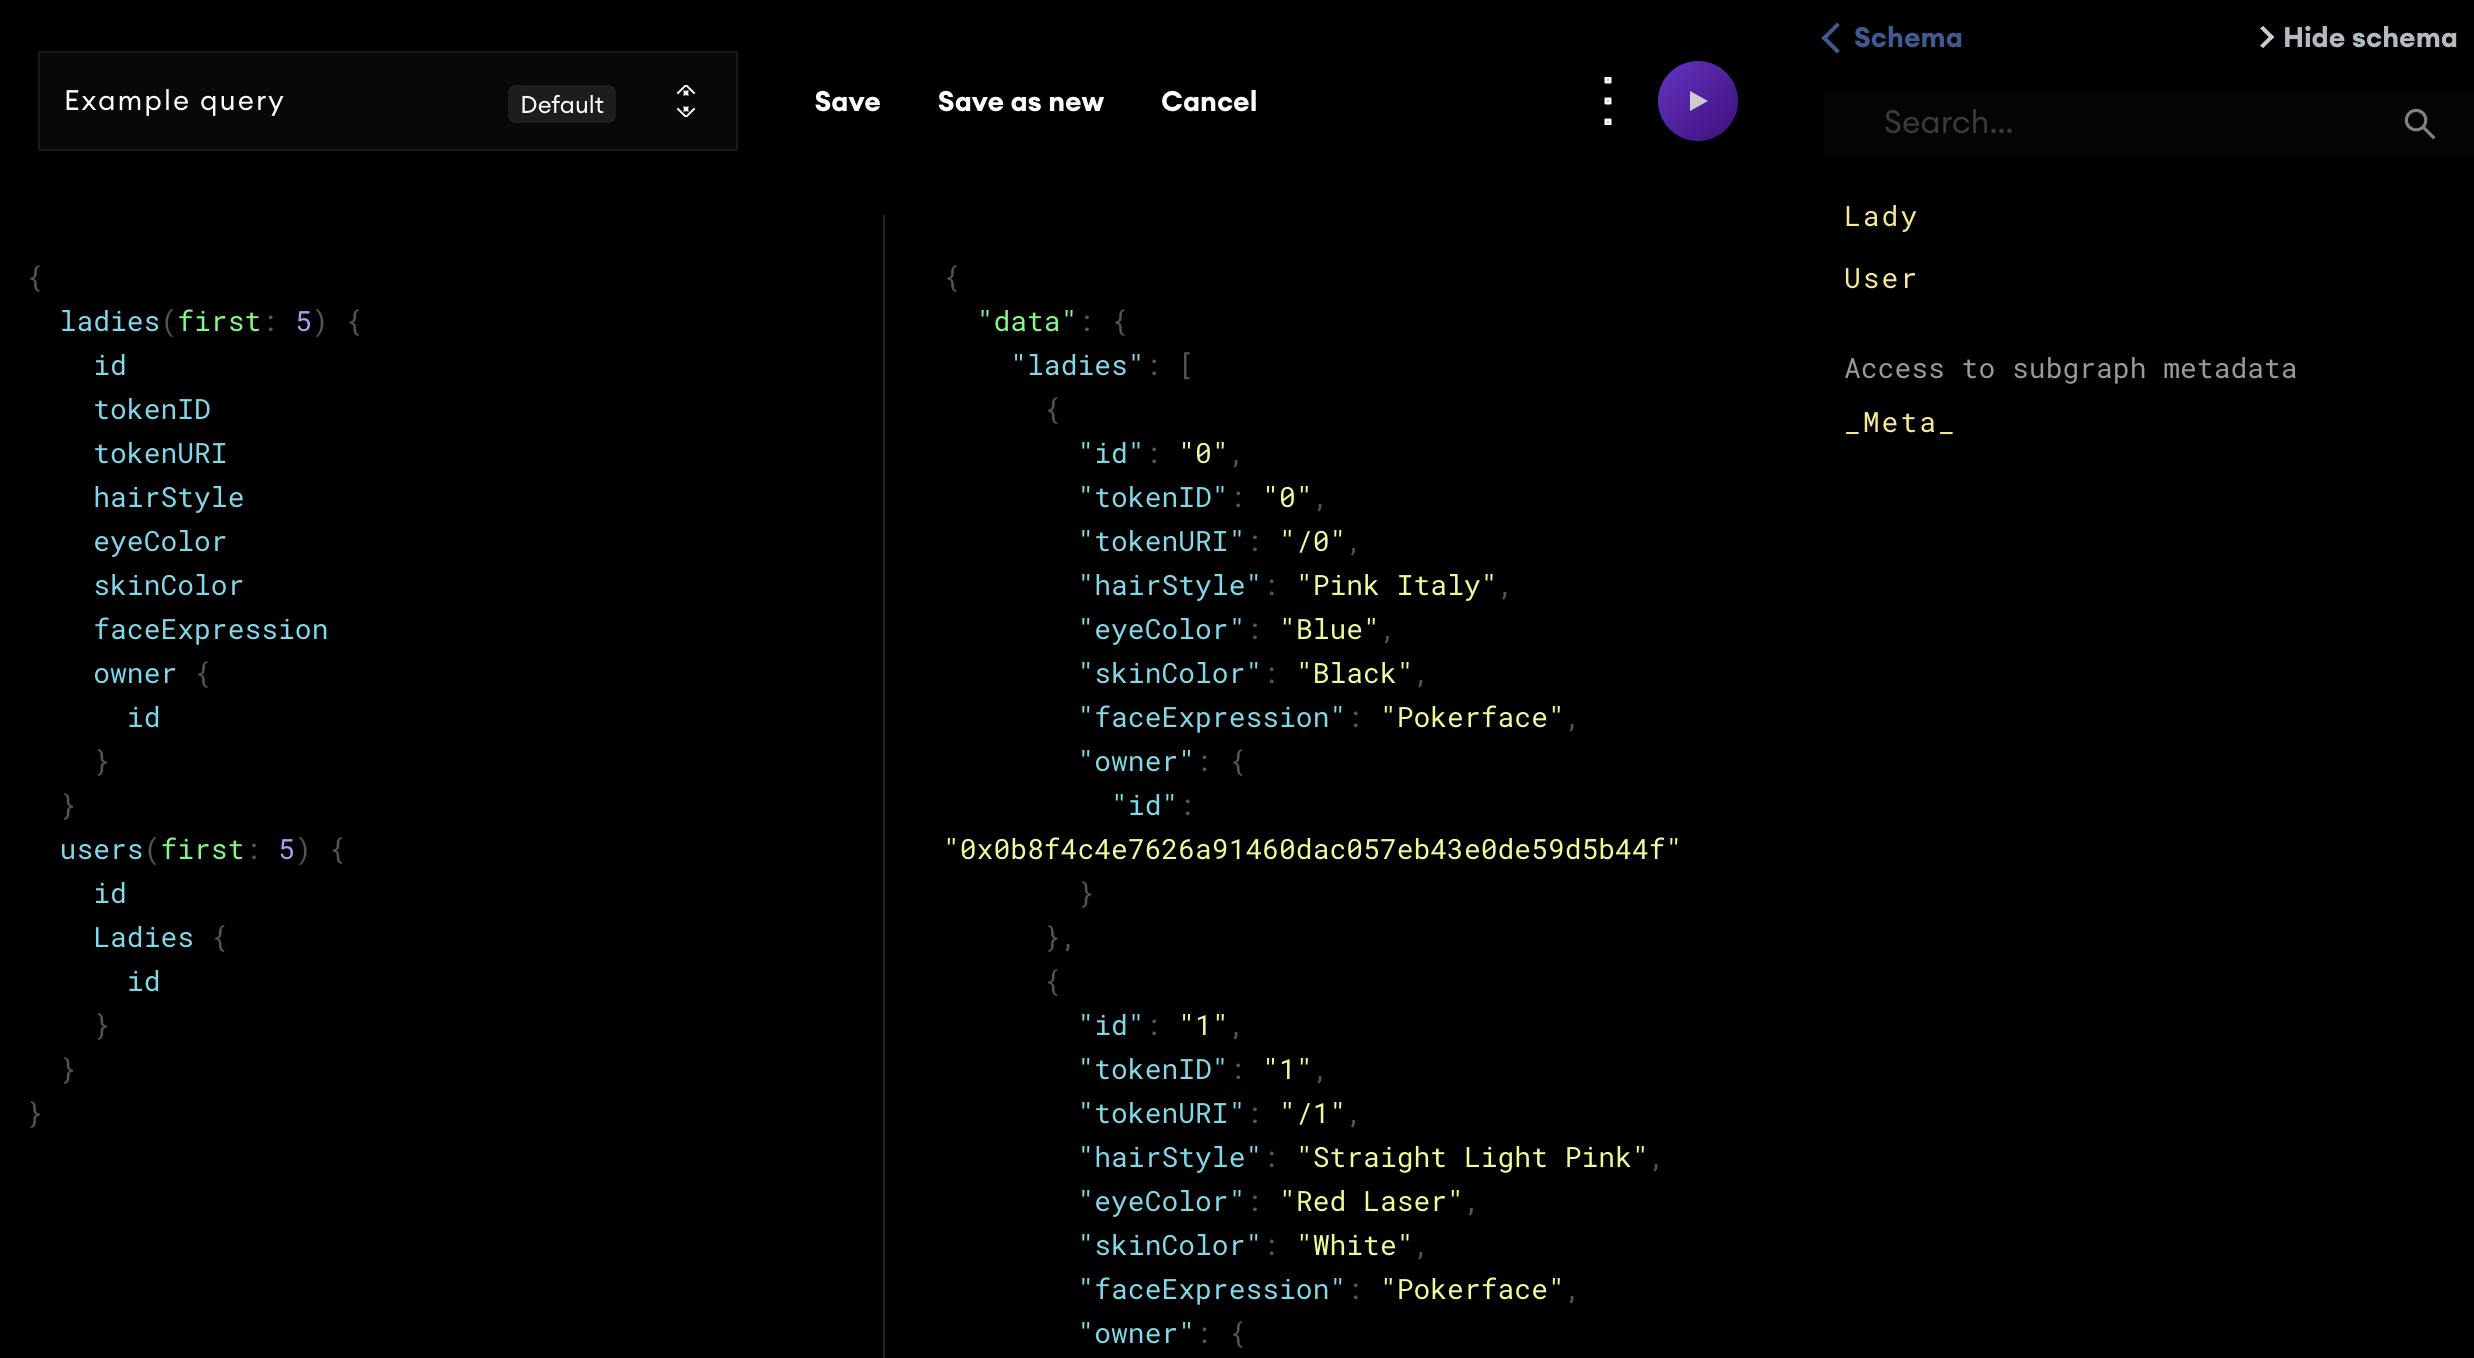
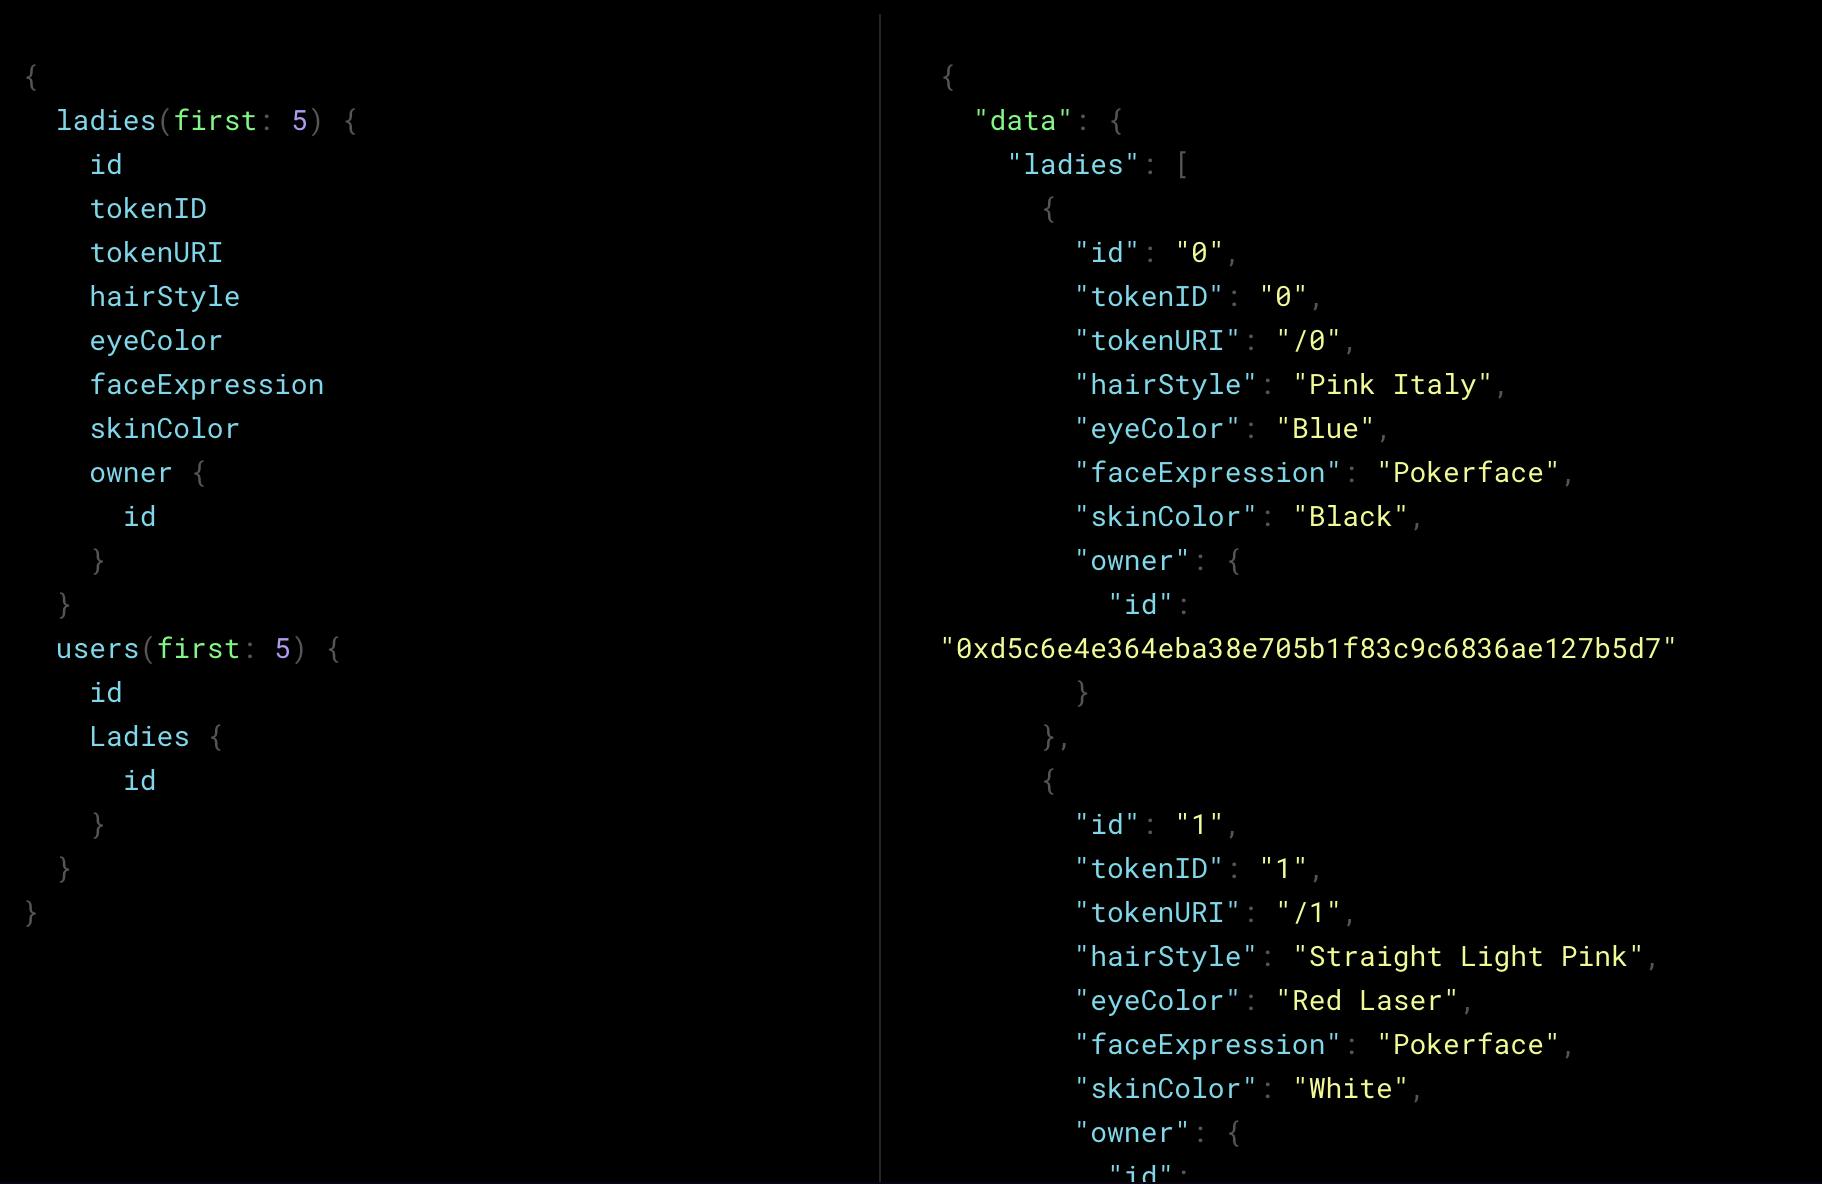
11. When the subgraph is deployed, the UI on The Graph dashboard will update and you’ll be able to make queries in the playground similar to a GraphQL playground.
Wrap Up
Now that you’ve deployed your subgraph, you can access it from your client application just as you would with a regular GraphQL API endpoint. Anyone can use your API and will be able to make calls to it and render this data to their UI.
If you enjoyed this style of teaching or want to learn more about The Graph, I'll be making a bit of content for The Graph in the coming days. Follow me on Twitter and Hashnode to be alerted when my tutorial, "Calling A Subgraph From Your Front End" is out. You can find me on all platforms @camiinthisthang.